

Gorgeous Green Holiday Make-up

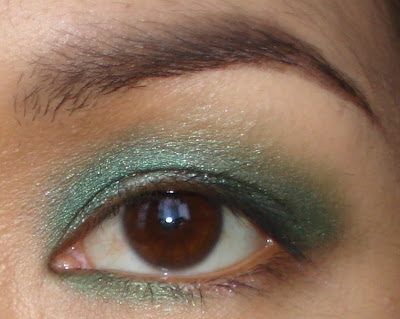
Again, I used my NYX Cosmetics. As I've told you before, NYX colors are great to play with. In this tutorial, I made a shortcut version in posting the step-by-steps instructions but still, I know you can bear with me. So, after preparing my face, lining my eye brows and contouring my nose, I made my tutorial leaving one eye untouched.
This is to compare how the eye shadows made my eyes stand out. See that?

Camera without flash
oO0Oo
Step 1.
Prep your face. Start with a clean face and neck. Moisturize it with Clean & Clear Oil Free Moisturizer. Then, using a sponge, apply the Etude House BB Cream onto face and neck. Final touch of Natural Rice Oil Absorbing Powder in Natural for setting your face.

oO0Oo
The photos below are the make-ups that I've used for the rest of my face. I labeled it with numbers so you'll know which corresponding Steps below I've used it.

 |
| In this palette, note that I just only used the ES35 and ES3. |
 |
| In this palette, I only used B3 and B6. |
oO0Oo
Step 2.
I lined my eye brows with IN2IT eye brow powder labeled as No.1 from the photo below. I picked the darker shade from that duo. Note that I intentionally put a dark eyebrow shade because the camera flash will wash-out your brows if you will put a lighter shade on it but then, you can use a lighter shade for your everyday wear.

I contoured my nose. Well, this is optional. You can leave your nose as is if you're blessed with high nose bridge hehehe. I used the bronzer labeled B4 for contouring.
oO0Oo
Step 3.
Prime your eyes for a more vibrant color and long lasting eye shadow. I used NYX Eye shadow base in Skin tone labeled as No.2. Apply it to your entire lids up to the brow bone. Also apply thinly in the lower lash line.
oO0Oo
Step 4.
Apply the NYX Jumbo Pencil in Slate labeled as No.3 onto eye lid as your base color. Start from the inner corner of your eyes outward.

oO0Oo
Step 5.
Using an eye shadow brush, apply the NYX single eye shadow in Mermaid Green labeled as No.4 onto the eye lid up to the crease area. After that, top it off with ES35 from the NYX Palette using a fluffy eye shadow brush.

Also apply thinly the Mermaid Green (No.4) in the lower lash line starting from the corner of the eyes up to half of the lash line. Then, using the NYX single eye shadow in Highlight labeled as No.6, use the fluffy eye shadow brush to highlight your brow bone sweeping it down to the inner corner of the eyes.
oO0Oo
Step 6.
Using the eye blending brush, I used NYX single eye shadow in Exotic Green labeled as No.7 and apply it to the outer-V going up to the middle of the crease area. Then, blend, blend, blend!

oO0Oo
Step 7.
Then using the flat eyeliner brush, I picked NYX single eye shadow in Exotic Green labeled as No.7, then apply it thinly to the lower lashline starting from the outer corner of lash line connecting with the Mermaid Green color.
oO0Oo
Step 8.
Line your eyes using the IN2IT Liquid eye liner in Black labeled as No. 8. Apply it closely as possible to the upper lash line. Then, after a minutes or just after the liquid eye liner gets dry, top it off with IN2IT Liquid eye liner in Turquoise labeled as No.9. Just follow the line you created with the Black.
Then, tight line your eyes by using IN2IT eye liner in Black labeled as No.10. Apply it in your lower water line. Then, using my finger, I picked a white shimmering eye shadow labeled as ES3 from my NYX Palette and I pat it gently around the corner of my eyes to make my eyes brighter.

Lastly, for your eyes, curl your lashes and finish it with your favorite Black mascara. I used Maybelline Waterproof mascara labeled as No.11. Don't forget to apply also in your lower eyelashes.


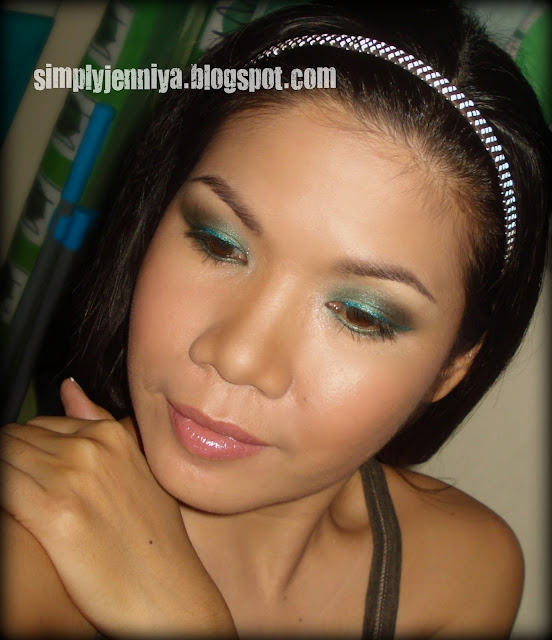
So, now you're done with your eyes! Isn't it gorgeous?
oO0Oo
Step 9.
Step 9.
Again, this is optional. I love contouring my face to make it look thinner. Using my flat-top bronzer brush, I picked from my palette B6. Apply it starting from the side of your ears downward to the hollow of your cheeks. After that, I picked the B3 and applied it to the apple of my cheeks bringing it up to my highest cheek bones. Then, blend it with the B6. Don't forget your jaw line and your chin.
oO0Oo
Step 10.
Lastly, put on your favorite lipstick. I'm using my MAC Intriguing Scarlet: 3 Cool Pinks. I applied the Make Me Melt then I top it off with the lipgloss in Sheer Vision. If you have any Pinkish Brown lipstick, that will do and any sheer lipgloss.


... and Voila!

Now, you're ready to celebrate Christmas with your family and your loved ones. Isn't it Christmas would feel more merry if you're extra beautiful? Hehehe...

This make-up is perfect for any party and for the Noche Buena, isn't it? I'll be posting more make-up tutorials for this holiday so you'll have more options to prettify yourselves. Keep posted for New Year's Holiday make-up soon.
Smile always and stay tuned. Merry Christmas!
Jenniya
