Hello beauties! Merry Christmas to everyone! I hope you all had a wonderful Christmas Eve last night. Well, I'm back again with a new FOTD. I hope you won't get tired of me doing again a make-up tutorial. You can close this window anytime and try to stop by again for a worth reading post in the future if you don't feel to read and see my post today hehehe.

My make-up tut for today is perfect for welcoming the New Year 2011. I got inspired to do a make-up using blues when I was keeping my new pair of shoes in a plastic shoe box.
 
Figliarina from SM Dept. Store. I actually bought two (2) new pairs of the same design but the other pair is Deep Purple. Love the colors! Yay!

Then, I remember Michelle Phan's tutorial that I've seen in her YouTube channel using blues. The striking color of my shoes made me recreate a Royal Striking Blue make-up afterwards. I'm so happy coz upon checking my eye shadow palettes; I had a lot choice of blues. Yey!

Royal Striking Blue


ooOO0OOoo
What I used in my eyes:
Be noted that I only used one (1) eye shadow labeled as ES27 and two (2) glitter colors labeled as G6 & G11 from this palette.

ooOO0OOoo
Step 1.
After putting on your foundation, eye shadow primer and lining my eye brows, I outlined my eyelids using a flat eye liner brush. I picked ES27 from the palette.

ooOO0OOoo
Step 2.
Fill in the outlined eyelids with ES27.


ooOO0OOoo
Step 3.
Apply also the ES27 in your lower lash line starting from outer line up to the middle in inwards strokes. After that, blend the eye shadow.
 

ooOO0OOoo
Step 4.
I applied the very blue glitter labeled as G6 from the palette using my finger onto the lids.

ooOO0OOoo 
Step 5.
I picked a silver glitter labeled as G11 from the palette and applied it around my tear duct area stroking inwards up to the middle of my lower lash line. Then, I tight line my lower water line rim with purple eye liner. If you have a blue, that would be perfect. It just happened that I don't have blue eye liner available, so I used my purple instead for alternative. 
 
 I winged it for a more dramatic effect.

ooOO0OOoo
Step 6.
Lastly for the eyes, I used a black liquid liner to line my upper lash line. Curl the lashes and I applied black mascara. 
Okay! You're done with the eyes.

ooOO0OOoo
Step 7.
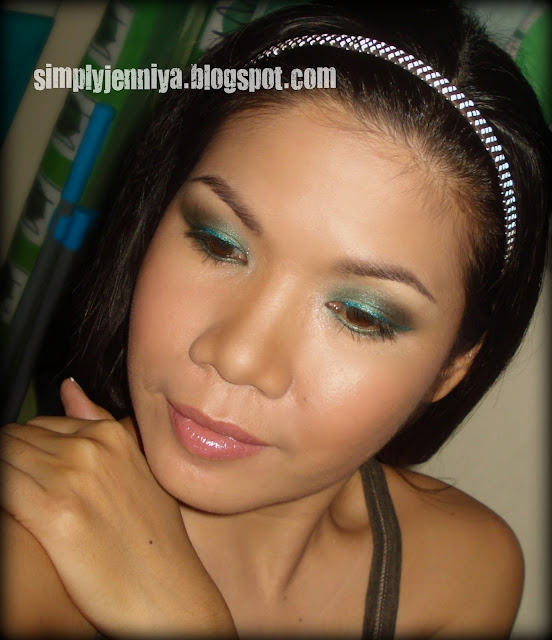
I was emphasizing more on the eyes so take note that I intentionally put on a light blush onto the apple of my cheeks to look naturally glowing cheeks effect. I don't want to overwhelmed my face coz my eyes had glitters already. I used B3 from the palette. And lastly, using my finger, I picked a thin amount of Make Me Melt and applied the Sheer Vision lip gloss in the middle of my lips both from my MAC Intriguing Scarlet palette.
So now you're ready to party and welcome the New Year!

I was looking for an outfit something like blue in my cabinet but I realized that I never had one hehehe. I have eyed this very blue scarf that I haven't used for ages now. So I put it on just for photography purposes only. I just imagined that I'm in a cold country somewhere to justify it lols! But look, yeah the blue scarf matches my make-up. Now, I have added to my wish list a blue tee or a blouse or a dress. I'll grab one once I find any hehehe.

If you are attending a party either Christmas or a New Year's Eve Party, then you can put on your glamorous glittery dark outfits of blues and blacks to match your make-up. But seriously, this kind of make-up is also nice for just a basic outfit on. In my case, since I'm planning to do this make-up in New Year, and I and my B will be spending New Year with his family, I got in mind to get dressed decently but still looking sexy. So I think I can just match it with any off-shoulder blouse I have available (no no for a tee) to show off some skin and a pair of stainless earrings. I do not want to look so over made-up and over accessorize so just an earrings will do. For the bottom, I will match it with a mini-skirt or denim shorts and let's not forget my striking blue shoes (see photo above) hehehe.

Then, here are some hair-dos that I think will do. Note that I styled my bangs like there's a hump whatever you may call it. I used 2 hair clips to hold my "hump" at the back lols!:


 Or use a hair clump then style your hair out with spikes.

I still have New Year's Glam make-up to be posted soon. I recreated some tutorial I got from the beauty gurus from the YouTube. I already have some tutorials in mind to recreate and I'm quite excited to do that.

Smile always and stay tuned.


Jenniya

I'm back again beauties. After a very hectic schedules this week, I and B (my hubby) just stayed at home today. Mind you, we are supposed to meet someone in Makati today but it has been cancelled. Anyway, last Tuesday, after buying some Christmas presents for our family and friends and yes, despite of our busy schedule, I still got the chance to make a make-up tutorial again even late in the afternoon when we arrive hehehe. Ala lang, I just got in the mood to do so. Well, I could say that getting my face made-up is also my way of de-stressing. 

Anyway, I love how this season is making our days cold especially at night. That's why, my make-up tutorial that I will share with you today is somewhat related with our cold season now. Well, the colors I've used for this tut has warm touches; just so perfect to compliment our weather. Again, this tut is a shortcut version. I will skip to post some steps.

Mettalic Silver Holiday Make-Up
Camera set with low flash.


ooOO0OOoo
What I used:
 I only used ES26, ES20, ES3, B3 and B4 from this palette.


ooOO0OOoo
Step 1.
Prep your face (moisturize, applied foundation, set powder and lining your eye brows). Using the small concealer brush or apply the pencil directly to lids and spread it using your ring finger, I applied the NYX Jumbo Eye Pencil in Milk from the inner corner of my eyes up to almost 2/3 of my eye lids. That will serve as my base color.
NYX in Milk.
 
ooOO0OOoo
Step 2.
Using an eye shadow brush, I picked ES26 from my NYX Palette and topped it off of the eye pencil in Milk. Same as 2/3 of the lids.

ooOO0OOoo
Step 3.
Using the same eye shadow brush, I picked Wheat Shimmer Wash from my Bobbi Brown Nude On Nude Shimmer Wash palette and applied it in the middle part with outward strokes but not reaching the outer part of the lid. See the photo below. 
 Wheat Shimmer Wash (Bobbi Brown)

ooOO0OOoo
Step 4.
I applied the NYX Jumbo Eye Pencil in Slate at the outer-V, then, blend it inwards up to the crease.
 NYX in Slate

Apply a small amount of NYX in Slate and then... Blend!


ooOO0OOoo
Step 5.
Using the same eye shadow brush, I picked Mica Shimmer Wash from my Bobbi Brown Stonewashed Nude palette and I topped it in the NYX in Slate. Blend it inwards.


ooOO0OOoo
Step 6.
Using the eye blending brush, I picked the ES20 from my NYX Palette and applied it in the crease area starting from the middle lid (where you can see the Silver) sweeping it down. It will create a deep set onto my eyes. Then, using the flat eye liner brush, I picked Mahogany from my Bobbi Brown Stonewashed Nude palette and applied it starting from the outer corner of my eye up to half of my lower lash line.
 

See the result? An illusion of my deep set eyes.

ooOO0OOoo
 Step 7.
I lined my upper lash line with IN2IT liquid eye liner in Black.
And then, I picked ES3 from my NYX palette and applied it near my tear duct to brighten my eyes.

Then, After curling my lashes, I applied my Maybelline Volum Express Mascara in Black.
Okay! You're done with your eyes. That's warm to look at, eh?


ooOO0OOoo
Step 8.
Contour your cheeks. Using my flat-top bronzer brush, I picked B4 and applied it onto cheeks with downward motion (see photo on how I do it). Then, I picked B3 and applied it in the apple of my cheeks, then blend it with the B4. Don't forget your jaw line and chin.


ooOO0OOoo
Step 9.
For my lips, I applied NYX round lipstick in Tea Rose. I really love this pink shade! Then, I applied lipgloss in the middle of upper and lower lip for a lip pout effect.


... and Voila!
Hehehe... Just "fish-ing"...

So, there you go beauties. That's another make-up tut which is perfect for Christmas season. This is nice for a Christmas date with your beloved (BF's, partner, hubby) or get together with your family and friends or attending any parties. I'm sure this make-up will make you stand-out.

Here's another shot:
Just recently, my B said my face looked thin in almost all of my photos. Honestly, he didn't like it. He said I'm losing weight again hahaha. I took it as compliment and secretly I am happy with what he said. It means that I'm not fat hehehe, and then, maybe that's the result of contouring my cheeks...it creates illusion of hollow cheeks and c'mon... it does a nice result in photo. Do you agree?

Okay, so much for this. There's still more Holiday make-up tuts to be posted soon. 

Smile always and stay tuned. Merry Christmas!


Jenniya

Hello again! It's Monday, our car is color-coded so I have the reason to just stay at home and play with my make-ups again. I'm back with a new FOTD for you beauties. I have a new gorgeous make-up tut for you that are perfect for meeting with your loved ones, relatives and your family in celebrating your Christmas. The FOTD I made is all about green colors inspired by my Christmas Tree lols! Why not eh? Hehehe...
Gorgeous Green Holiday Make-up
Again, I used my NYX Cosmetics. As I've told you before, NYX colors are great to play with. In this tutorial, I made a shortcut version in posting the step-by-steps instructions but still, I know you can bear with me. So, after preparing my face, lining my eye brows and contouring my nose, I made my tutorial leaving one eye untouched. 

This is to compare how the eye shadows made my eyes stand out. See that?
Camera without flash


oO0Oo
 Step 1.
Prep your face. Start with a clean face and neck. Moisturize it with Clean & Clear Oil Free Moisturizer. Then, using a sponge, apply the Etude House BB Cream onto face and neck. Final touch of Natural Rice Oil Absorbing Powder in Natural for setting your face.

oO0Oo
The photos below are the make-ups that I've used for the rest of my face. I labeled it with numbers so you'll know which corresponding Steps below I've used it.
In this palette, note that I just only used the ES35 and ES3.
In this palette, I only used B3 and B6.

oO0Oo
Step 2.
I lined my eye brows with IN2IT eye brow powder labeled as No.1 from the photo below. I picked the darker shade from that duo. Note that I intentionally put a dark eyebrow shade because the camera flash will wash-out your brows if you will put a lighter shade on it but then, you can use a lighter shade for your everyday wear.
I contoured my nose. Well, this is optional. You can leave your nose as is if you're blessed with high nose bridge hehehe. I used the bronzer labeled B4 for contouring.

oO0Oo
Step 3.
Prime your eyes for a more vibrant color and long lasting eye shadow. I used NYX Eye shadow base in Skin tone labeled as No.2. Apply it to your entire lids up to the brow bone. Also apply thinly in the lower lash line.

oO0Oo
Step 4.
Apply the NYX Jumbo Pencil in Slate labeled as No.3 onto eye lid as your base color. Start from the inner corner of your eyes outward.

oO0Oo
Step 5.
Using an eye shadow brush, apply the NYX single eye shadow in Mermaid Green labeled as No.4 onto the eye lid up to the crease area. After that, top it off with ES35 from the NYX Palette using a fluffy eye shadow brush.

Also apply thinly the Mermaid Green (No.4) in the lower lash line starting from the corner of the eyes up to half of the lash line. Then, using the NYX single eye shadow in Highlight labeled as No.6, use the fluffy eye shadow brush to highlight your brow bone sweeping it down to the inner corner of the eyes.


oO0Oo
Step 6.
Using the eye blending brush, I used NYX single eye shadow in Exotic Green labeled as No.7 and apply it to the outer-V going up to the middle of the crease area. Then, blend, blend, blend!


oO0Oo
Step 7.
Then using the flat eyeliner brush, I picked NYX single eye shadow in Exotic Green labeled as No.7, then apply it thinly to the lower lashline starting from the outer corner of lash line connecting with the Mermaid Green color.


oO0Oo
Step 8.
Line your eyes using the IN2IT Liquid eye liner in Black labeled as No. 8. Apply it closely as possible to the upper lash line. Then, after a minutes or just after the liquid eye liner gets dry, top it off with IN2IT Liquid eye liner in Turquoise labeled as No.9. Just follow the line you created with the Black.
Then, tight line your eyes by using IN2IT eye liner in Black labeled as No.10. Apply it in your lower water line. Then, using my finger, I picked a white shimmering eye shadow labeled as ES3 from my NYX Palette and I pat it gently around the corner of my eyes to make my eyes brighter. 

Lastly, for your eyes, curl your lashes and finish it with your favorite Black mascara. I used Maybelline Waterproof mascara labeled as No.11. Don't forget to apply also in your lower eyelashes.
 

So, now you're done with your eyes! Isn't it gorgeous?


oO0Oo
Step 9.
Again, this is optional. I love contouring my face to make it look thinner. Using my flat-top bronzer brush, I picked from my palette B6. Apply it starting from the side of your ears downward to the hollow of your cheeks. After that, I picked the B3 and applied it to the apple of my cheeks bringing it up to my highest cheek bones. Then, blend it with the B6. Don't forget your jaw line and your chin.

oO0Oo
Step 10.
Lastly, put on your favorite lipstick. I'm using my MAC Intriguing Scarlet: 3 Cool Pinks. I applied the Make Me Melt then I top it off with the lipgloss in Sheer Vision. If you have any Pinkish Brown lipstick, that will do and any sheer lipgloss.


... and Voila! 
Now, you're ready to celebrate Christmas with your family and your loved ones. Isn't it Christmas would feel more merry if you're extra beautiful? Hehehe...

This make-up is perfect for any party and for the Noche Buena, isn't it? I'll be posting more make-up tutorials for this holiday so you'll have more options to prettify yourselves. Keep posted for New Year's Holiday make-up soon.

Smile always and stay tuned. Merry Christmas!


Jenniya